


The new and improved Jay G Parlor Guitar…electro-magnetized…
This has been my go to guitar for the past couple of months—it’s small, stays in tune, and has a low, fast action. I’ve drawn more inspiration in the way of technique noodling around on this guitar, then from all of the other acoustics in my rotation, and have even been able to squeeze a bit of slide work out if it, in spite of its low action.
In short, I’m happy with this guitar, but I can’t be truly happy until I risk ruining it, by featuring it in a new project. The plan was to install an endpin strap button jack and to mount the pickup in the least destructive way possible—it worked out, sort of…
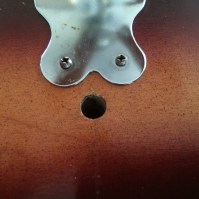


There are many reasonable ways that I could have handled this situation, one of which, was to fill the hole, let it dry, and then drill with my very sharp and accurate drill bit, that I normally use to install end pins, the following day.
However, I was not going to let the lack of proper tools and planning hold up this project for another day, so I taped the area as usual and then taped a ¼” thick block of wood over the hole. The thought was that once I drilled through the block, the block would then guide the bit through the remainder of the guitar. That didn’t happen; instead, the bit went through the block, the block loosened, and the bit shifted leaving me with this…

No big deal, because it led me to this…


I drilled a center hole and filed a small notch to account for the tailpiece. It sits flush against the guitar and will look pretty cool after it develops a patina.


For the pickup, I used the usual double coil, 9v power adapter pickup. I wired them in series since I wasn’t looking to enter the stereo field for this project. I added some leads and followed the solder with a generous blob of hot glue for added stability—I stole that trick from Dan Block; he used to test his circuits with hot glue before soldering. I slid the fasteners over the leads and then placed the assembly inside the guitar.
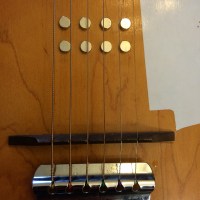
Mounting the pickup was easy, I shoved my hand inside the sound hole and found a flat, open area. One by one, I placed a magnet above the pickup and they each snapped into place—probably the easiest part of the whole project. Then I moved the pickup into place, centered below the strings. The magnets alone are strong enough to hold the pickup in place.


I fed the wires through the hole, trimmed them to length, and added my fabricated copper cap. I placed a ground wire beneath the tailpiece, soldered the points, and added more hot glue. Screwing on the fasteners blind can be frustrating, but it worked out.


As a new addition, November 2017, here is a duct tape hardshell coffin case that I made for transporting this guitar, along with my other parlor guitars. Follow this link for additional information:
That’s it…watch my video, check my other projects, and then risk destroying your favorite guitar.
Check out this additional video with some added delta grit:
Thanks,

