
JSA S2 – Better Video Demonstrations – Clarity with Less Noise
Understandably, this is not technically a “building” suggestion, but presentation quality is just as important as build quality. You can build the most beautiful sounding guitar ever, no one will ever know if you can’t properly represent the audio. I have experienced difficulties producing quality audio on my videos—the guitar and amp would sound awesome in the room, but the audio on the video would sound weak, noisy and disappointing.

I find that I spend more time than I should trying to produce videos with clearer sound and less noise. In the past, after multiple attempts/setups, I would either settle for the least offensive video attempt or not post anything at all. Recently, I tried something new.
In an attempt to make a better sounding video, I pulled out my old iRig Guitar Interface, which I usually use with my iPhone tuner or the GarageBand app. I felt that there had to be a way to use it to record videos.
First, I tried the standard picture/video app—no go, it didn’t record the audio. After a bit of research, I found that IK Multimedia, the producer of my iRig Guitar Interface, offers the iRig Recorder app for iPhone and Android. The iPhone version is available in the App Store for $9.99 and the Android version at Google Play for free —there is also a free version for iPhone, but I’m not sure if it has the same capabilities as the full version. Try the free one first; I just didn’t notice the free version until after I had purchased the full version.

Follow this link to purchase the iRig Guitar Interface for $7.99 with fast/free shipping:
https://rover.ebay.com/rover/0/0/0?mpre=https%3A%2F%2Fwww.ebay.com%2Fulk%2Fitm%2F352102593914
iRig Recorder works flawlessly with the iRig Guitar Interface to produce clear, professional sounding recordings with very little room noise. Using the iRig Guitar Interface, you can input the sound via direct insert (DI) or use a microphone. Using DI entails plugging the guitar straight into the interface while using a microphone necessitates placing the mic in an optimal position to pick up the sound of a speaker or acoustic guitar. I didn’t find that inserting the guitar directly into the interface offered a decent sound, so I recommend using a microphone if possible.

I used a Shure SM57, with a mic cord and XLR to 1/4” jack transformer to connect to the iRig interface. Once it was connected, and the iRig Recorder app was set to video record, I was able to gain a signal. Additionally, I was able to monitor the signal via a set of earbuds plugged into the headphone jack on the interface. I’d like to take you through the steps necessary for setting up the interface, microphone, and iRig app. Then, I’ll show you how to retrieve your video and send it to your picture app.

Once you decide what you will record, consider how you will place the connected microphone. A good starting place for micing an amplifier is to place the microphone off center and to one corner; then you can adjust the proximity and angle of the mic later after checking the sound levels.
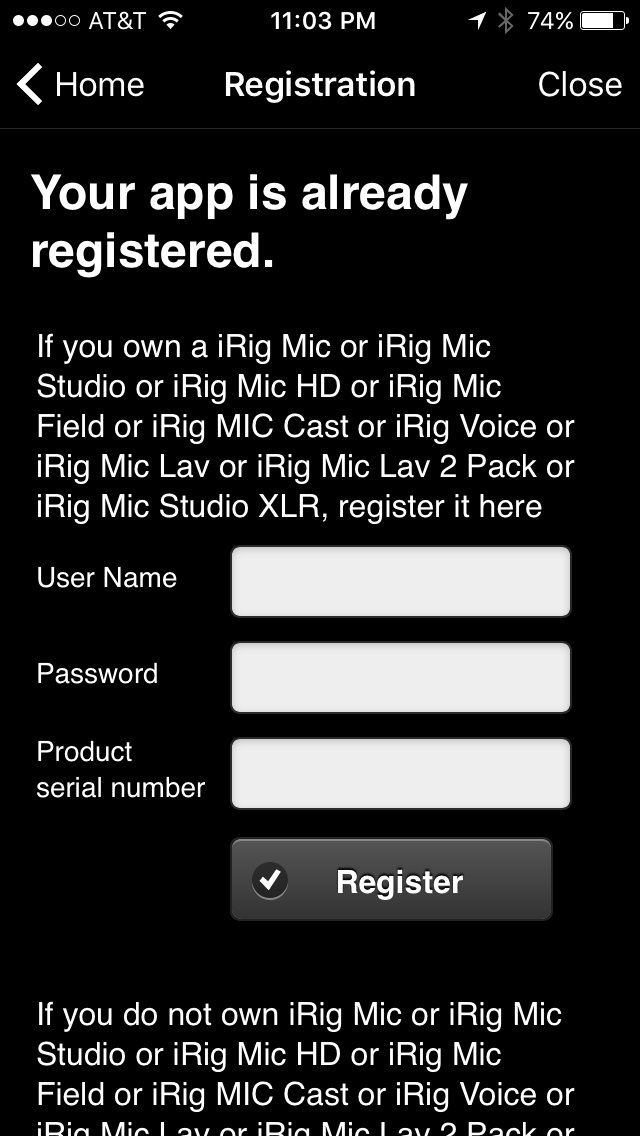
After purchasing/getting the app, begin by registering the product—it’s quick and painless.


You begin on this page, which serves as an archive and utility hub. To enter the video recording page, tap the camera illustration in the lower righthand corner.
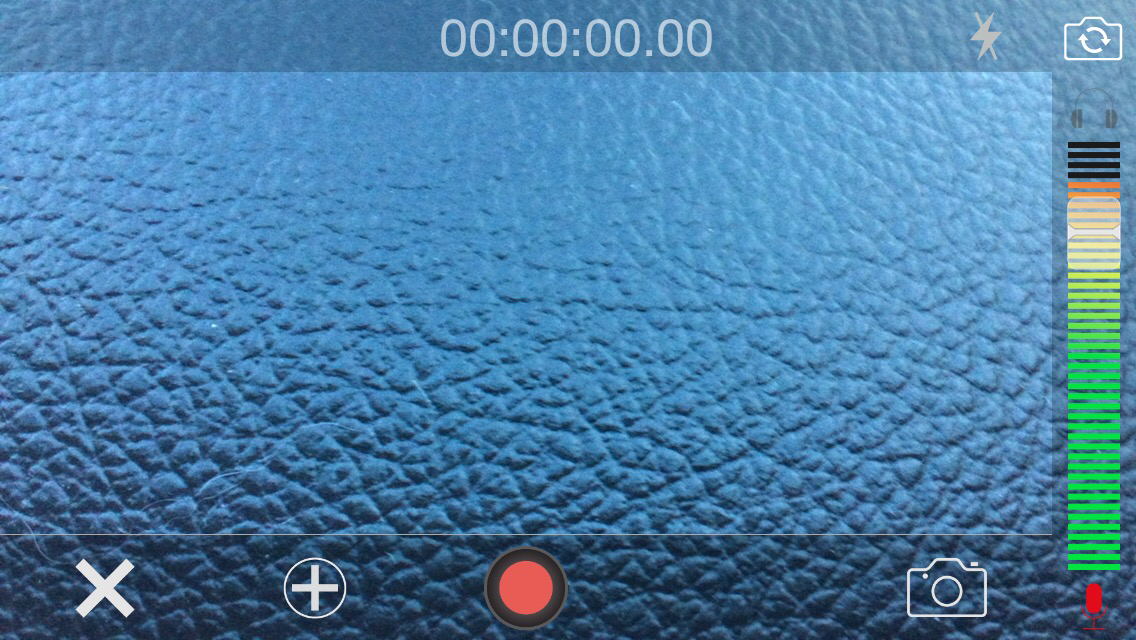

This is the recording screen. To record from the front-facing camera, leave it as is; to record video from the rear-facing camera, tap the illustration of the camera, with the center arrows in a circular motion, in the upper righthand corner of the screen. I usually record from the rear-facing camera so that I can monitor the audio as I am recording.
![]()

You must also set the audio signal. The red microphone in the lower, righthand corner indicates that the app is monitoring and is ready to record. The light bar above the red microphone shows the sound level—it begins on the bottom at green (lowest level) and moves up through increments of yellow, orange, and then red. The small rectangle with the white, horizontal line is a fader; it allows you to raise or lower the input signal.
Before you begin to record, play the guitar or amplifier at the same volume/level that you plan to play when recording. Watch the light bar and adjust the fader up or down, as needed. Throughout the entirety of the song, the light bar should be as close to peaking at orange as possible, without reaching red. If the light bar hits red, even once, the fader should be lowered, as the recording may clip/distort in those spots.

When you are satisfied with the audio levels and are ready to record, tap the round, red button in the lower center position—this is the record button. Tap the red button and play a small amount, as you will when you record, then tap the red square in the bottom, center of the screen—it will automatically put you back in the archive screen.
Plug headphones into the iRig interface, tap the triangular play button and listen to the playback while watching the light bar. If the light bar reaches red or the recording distorts back lower the fader to decrease the input level. If the recording sounds weak or there is noise/hum, try any configuration of adjusting the volume on the guitar or amp or adjusting the proximity or direction of the microphone. (Recording is a game of trial and error—experiment with these parameters until you achieve either the desired results or something that will work for your purposes). The red square at the bottom center will stop the recording feature.

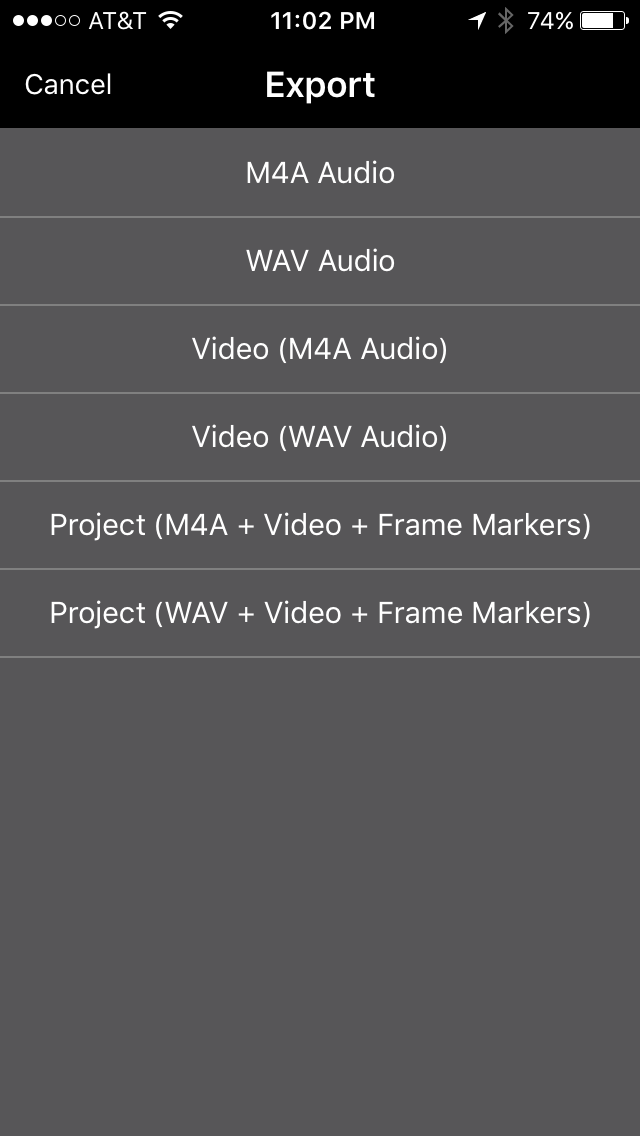
If at some point you are happy with the video recording, you can easily export it to your “Photos” app. First, tap the left-facing arrow (<) in the upper lefthand corner of the screen. This will take you to the archive screen. Select the desired video file by tapping it—it will be highlighted like “020” in the image above. Then, tap the box with the upward-facing arrow; you will arrive at the export screen. There are six options—tap on “Video (WAV Audio)” forth from the top.


Tap on “Open in…” at the very bottom. In the next screen, move to the bottom row, second from the left—tap the “Save Video” option. Exit the iRig Recorder app. Open either your Camera or Photos app to retrieve your video. From there you can post it to social media, add it to a YouTube or send it to a friend via email.
Here’s a video that I recorded using the iRig Guitar Interface and iRig Recorder app. I followed the steps as outlined above and simply miced a small Peavey amp. Please excuse the sloppy playing, but notice the clean signal to noise ratio. It’s not a bad audio recording for a being recorded with an app on an iPhone. Enjoy!
Thanks,
![]()
