JSA Cigar Box Guitar S4 – Homemade Plexiglass Pickguards and Cavity Plates

I’m working on a modification for this guitar that necessitates that I drill a hole in the cavity plate, so I decided to make a substitute to keep from damaging the original—because to be frank, where am I going to find a replacement cavity plate for a DeArmond?

I didn’t have a Dremel and didn’t really know how to cut or shape plexiglass, but I found an 8″ x 10″ piece for $4.00, so I was ready to rock. After feeling my way through fabricating the main cavity plate, I decided to make a toggle switch cavity plate as well…

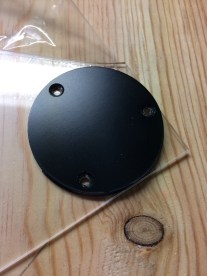
I had the original, so I removed the protective plastic from one side and placed it as close to the edges as possible. Then, I traced it in Sharpie.

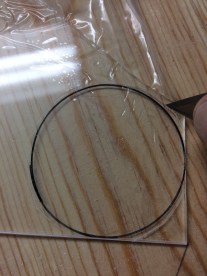
Quick research uncovered that I need only cut around the shape with a razor blade. After etching a circle about a 16th of an inch outside of the Sharpie outline, I flipped the blade backward and traced the etched circle two more times.

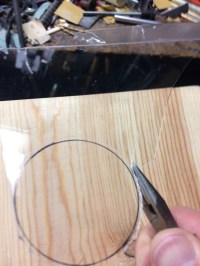
I removed the protective plastic from the bottom and then used a pair of small needle-nose pliers to break off the outer material, in small pieces, leaving a rough circle.

Using a small bench grinder, I removed the material in an even, circular motion up to the Sharpie outline. Then, placed the cover in the hole to check for proper fit and went back to the grinder for small adjustments. In absence of a grinder, files or sandpaper could be used, but it would require multiple grits and a lot of time.

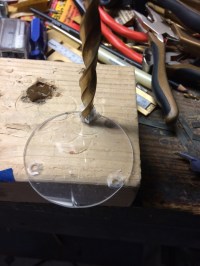
Once the cover fit, I marked the holes in Sharpie and carefully drilled the holes. Then, I switched to a larger bit to countersink the hole.

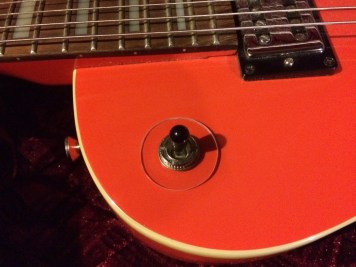
I cleaned up the edges with some 220 sandpaper and then installed it.

This same method can be used to make pickguards or switch plates and the plates and guards can be painted or otherwise decorated on the bottom if desired.

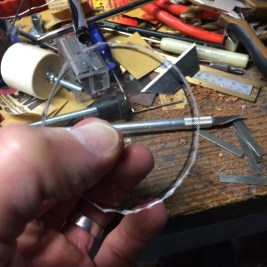
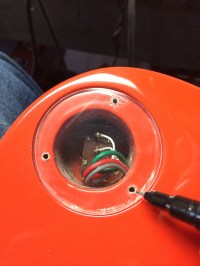
See…now I have my 7-pin jack installed and I’m ready to complete the modification without destroying the original plate. As a word of caution, you’ll notice that the plate broke on the screw hole to the right—be careful when drilling your recess hole and don’t over-tighten the screws.

Thanks,

“Road Ready Polymer” – All-Plastic, First Act Electro-Acoustic Modification

I found this plastic First Act acoustic for six dollars at Goodwill—why not…everyone has to get their hands dirty at some point.

Here are the before pictures:

Body and Finish:

The body and “finish” were in fairly good shape, but I had to do something the change it’s appearance. I decided to leave the back, sides, and neck alone, so I painted only the top of the body and front of the head.

I wanted to make the deterioration on the finish more interesting so first I painted the top and head Safety Red then I painted Hammered, Burnished Amber. The thinking is that the amber will first wear down to red, then to the original “burst” finish.

Another interesting aspect of this guitar is the inner structure. The guitar seems rather sound, so I’m confident that it should holdup to 11’s.

Tuners:

I changed out the tuners—the replacements were second-hand, crappy yes, but not as bad as the originals. The classical acoustic tuners fit perfectly without modification and the addition of brass screws finished off the abomination perfectly.

Pickup and Bridge:

Of course for the pickup, I taped together two Nd144 Electromagnetic Cigar Box Guitar Pickups. I drilled and installed a 1/4″ jack in the lower-right and wired it straight to the pickup.

For pickup installation, I taped two washers in the bridge position with Command Strips—the magnets on the pickups attached to the washers for easy installation.

The bridge is a 3/16 brass bar that helps enhance the steel strings, serves as a grounding point and adds a focal point.

Final thoughts:

Otherwise, it works—it cost $22, plus scrap parts, and took a few hours to enhance. Plus, the top will look pretty cool once it acquires some genuine wear and tear.

Check out this quick and dirty video, which offers some haphazard slide work:

Thanks,

“His Dudeness” – Electro-Acoustic Resonator Guitar Modification

Follow this link for additional photos and build notes:

https://wp.me/P3WRqw-VO

Call it The Dude, His Dudeness, Duder, or even El Duderino, but don’t call it Mr. Lebowski.

I received a request to modify this old classical, parlor acoustic. The gentleman had seen a few of my other acoustic modifications and wanted something similar for his acoustic. He gave me full artistic control, so I added materials based on the guitar’s size, shape and the condition of the neck.

Here are some before pictures:

Check out these quick and dirty demonstration videos—one is amplified with distortion the other is unplugged and ends with a little Nuge, but hey, it’s a free for all:

Thanks,

“Dirty Secret” – Electro-Acoustic, Variable Resonator, Steel-String Parlor Guitar

fullsizeoutput_725IMG_2461IMG_2462IMG_2471fullsizeoutput_722fullsizeoutput_72d

I received this 70’s era, Trump classical guitar from my mother-in-law a few years back. A few of the tuners were broken, the neck was bowed and the bridge was either broken or I just decided to cut it off—it’s hard to say at this point—but knew when I saw it, that I wanted to do something drastic.

I looked around and found an adjustable floor register and then cut a large rectangle out of the body; but then it sat, because I wanted to strip off all of the finish. I found that it was very difficult to remove the finish, but finally a couple of days ago I locked a wire brush attachment into my drill, determined that the finish would come off once and for all—it did, sort of, but I also distressed the livin’ out of the wood. No problem, because sometimes ugly is part of the game.

I call this one, Dirty Secret; it’s like that horrific kid in the horror movies, that’s hidden in the basement— someone unwittingly finds themself in said basement; it’s dark and cluttered, unseen feet are heard scampering across the floor, and then a ball comes rolling out from the shadows, creeping everyone out…well it’s not like that, but stay with me…you have a Les Paul and a Strat up stairs in the stable, but instead, you prefer to play this piece of trash, for some indescribable reason…why?

Body and Finish:

IMG_1455IMG_1459IMG_1457

As stated earlier, I cut a 4″x8″ rectangle into the center of the guitar to accommodate an adjustable metal floor register. The purpose of the register is two-fold—primarily, to create a resonator sound and secondarily, to control the amount of resonator sound. The outcome was not as drastic as I would have liked, but there is a distinct difference between the louvers in the closed position and open position: in the closed position, the sound is tighter/cleaner, as the louvers move to the open position, the sound becomes more resonate and rattly.

IMG_2425fullsizeoutput_726fullsizeoutput_728

Since I cut through all of the bracing, the top needed need reinforcement, so I cut a few pieces of 1″ square rod to offer stability and a solid base through which to install the floor register. Additionally, I cut a a small groove into the top/center of the register to accommodate the fretboard—it just looded more finished and covered up the fact that I cut the hole incorrectly.

fullsizeoutput_723fullsizeoutput_730fullsizeoutput_72eIMG_2476IMG_2478fullsizeoutput_72fIMG_2480

The old finish was removed with sandpaper on the head, neck, and fretboard; however, the finish on the body was removed with drill-powered wire brush. Much of the heavy finish was removed, but a red stain remained; additionally, the brush removed too much material in some places, which left the body distressed and damaged. After sanding all of the surfaces, I applied a finish made of vinegar and steel wool that helped accentuate the distressed areas on the body.

Tuners:

fullsizeoutput_720fullsizeoutput_721

The tuners had to be replaced—some were broken, others were seized. I subbed in a set of butterfly-style Grover tuners, which had shafts that were larger than the original tuners. I enlarged the holes to 3/8″ and installed the replacements.

Tailpiece and Bridge:

IMG_2464IMG_2465

I used a discarded tailpiece from a previous build. I sanded off the tarnish and centered it on the body. Two small zip ties hold the tailpiece tight to the register to reduce friction noise. For the bridge I used a brass hinge pin; I flattened the bottom with a file and found the correct scale based on doubling the measurement of the twelfth fret.

Pickup and Output Jack:

fullsizeoutput_72cIMG_2434IMG_2439fullsizeoutput_727IMG_2454IMG_2429

I taped two JSA Nd144 Electromagnetic Cigar Box Guitar Pickups together and connected them to an acoustic guitar endpin jack. I couldn’t place the pickup in a normal location, because of the louvers on the register, but there was a small location just back from the  end of the fretboard. I superglued an old razor blade below the fretboard and installed the pickup by attaching the magnets on the pickup to the razor blade. A 1/2″ hole was drilled, in the bottom of tyhe guitar, where the strap button was previously located.

Check out these quick demonstration videos—one is amplified with distortion the other is not—enjoy:

Thanks,

img_1926-4

Quick and Dirty Acoustic Pickup

img_1274img_1324

I needed a pickup that I could easily install and remove from guitar to guitar—this is what I created with few spare parts I had laying around.

img_1269

I grabbed a Lego crate and lid got the housing and a RCA jack for the connection. The active agent is a piezo disk that I broke out of a buzzer housing.

img_1270

Drilled a hole in the bottom of the crate and installed the RCA jack.

img_1271

Then, I drilled a hole in the  lid and inserted the piezo wires.

img_1272

Next, I soldered the wires to the hot and ground terminals on the RCA jack and closed the crate.

img_1273

To allow for easy installation and removal, I added a 3/8″ removable Glue Dot to  the back of the piezo disk and one side of the Lego Crate. Done.

It needs some more sound shaping, but it has potential and is decent in a pinch.

Check out my video:

Thanks,

img_1926-2


Yard Dog Tremolo (controlled by cellphone app)

img_1308img_1307

So…this is the newest addition to my Yard Dog collection—super low rent manifestations of repurpose and modification. This project is based upon the mechanism present in the Strobe Light Tremolo; however, instead of utilizing an internal light source, the light comes from a free and ordinary cell phone app. This allows for many variations, as flashlight apps with strobe light features can vary in speed and brightness, thus allowing for a bit of customization from user to user.

img_1197img_1208img_1207

I started with an ordinary sardine can—cleaned it out and drilled the holes for two ¼” jacks and a single pole, double throw switch.

img_1219img_1220

It’s wired simply—audio in to switch with one side as a bypass and the other side controlled by the photocell. The photocell was extracted from an ordinary nightlight that comes on automatically when a room becomes dark.

img_1280img_1281img_1282img_1283

I originally had just the piece of painter’s tape over the top, but found that the phone created noticeable interference. Therefore, I lined the inside with aluminum foil and then carefully insolated the bottom with part of a sticky note and the top with more painter’s tape, just in case the foil shakes loose. Since the phone creates so much interference and it sits on top of the unit, I cut about an 1/8” of aluminum foil to keep my signal quiet; it is barely audible when the light turns on and off. I cut a small, strategic hole exactly where the phone’s LED light exits the phone.

img_1284img_1295

Duct tape was the lowest rent covering that I could thinking of, so I placed two pieces over the top and ran my thumb around the edge a few times. Then, I used a razor blade to cut the excess tape close to the outer edge. I found the hole and cut the duct tape and then wrote the name in red Sharpe.

That’s it—a simple, effective analog effect driven by digital technology.

Watch my video:

Classical Acoustic Resonator Guitar

img_0866img_1180

I picked up this broken Fender Classical Guitar at a local antique mall for pretty cheap. The bridge was completely ripped off and tied to the headstock in a sandwich bag. I wasn’t sure what I was going to do with it, but thought, why not.

img_0867img_0868img_0871img_0872

First, I tried to clean the broken wood off of the bridge and guitar top; I applied glue and clamped it—that proved unsuccessful, so I cut a big ol’ hole in the top about the size of a stove drip pan, because that’s what I do.

img_0910img_0911img_0873img_0914

I found that a paint can lid from a five gallon paint can fits perfectly over a stove drip pan—who knew. Four small screws were installed to keep the lid from shifting when the strings exert pressure. A tailpiece from an old acoustic was sanded and then added for greater stability.

img_0876img_0877img_0878

I cut the ends off of the bridge to make in more compact and then cut and stacked two pieces of brass rod to serve as a saddle.

img_0965

I found that this modification required a lot of reinforcement—I glued the bridge to the lid, cut small holes on either side, and then zip-tied a similar-sized block of wood to the bottom of the paint can lid from over the bridge. Additionally, I installed a brass bolt through the top of the lid that secured it to the drip pan via an old mounting bracket from a junction box.

img_1180img_0965

I strung it with nylon strings just to see what it would sound like—it doesn’t resonate similar to steel rather, the resonating sound comes from the unplayed/untouched open strings and the untouched top. The player must keep his or her arm off of the top of the guitar or it will sound like any other classical guitar, which is cool, because it offers flexibility with regard to sound.

That’s it; check out the video:

Stay tuned for the removable pickup rig that I have designed for use with this guitar, since nylon strings negate use of my 9 volt power adapter pickup.

Thanks,

img_1926-2