Ripped Baseball Bat “Cigar Box Style” Electric Slide Guitar

IMG_2851 IMG_2848 IMG_2849

IMG_2850

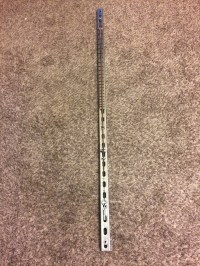
I completed this prototype back in November 2015. It was a really cool project, but I just got around to writing up the build notes. The first thing I had to figure out was how to rip the bat in half. I didn’t have a table saw or bandsaw—just a circular saw and chop saw—so I decided to make a box that would almost perfectly fit the baseball bat. Then, I used a square to center all of the parts of the bat parallel to the sides of the box. To achieve this, I used different thicknesses of scrap wood to shim the bat into a centered position.

Once the bat was centered, I used a square to mark the cutline, which was slightly off center to allow for the best bat depth to fretboard width ratio—I wanted to retain as much material as possible to add strength, but I still needed enough fretboard width for three strings. I found my measurement and then set the circular saw guide relative to one side of the box.

IMG_2759IMG_2761IMG_2762IMG_2763

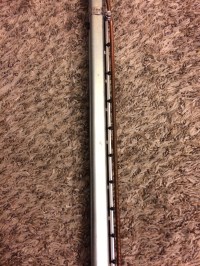
I placed the box on the ground and up against the sidewalk. The box is much longer than the bat to allow extra room for the circular saw to drop in and begin a straight run toward the end of the bat. The saw must run through at a slow even pace, straight through the end block to complete the cut. The bat moved a bit, as the saw cut through its length. This resulted in a less than flat surface that required a bit of planing. I placed the surface with a hand planer until a level sat flat against the surface. I sanded the cut surface with sandpaper, but left the outer part of the bat untouched.

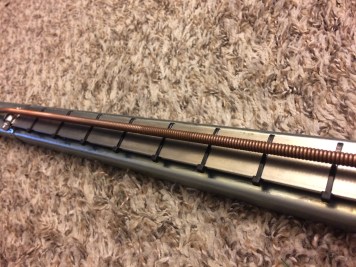
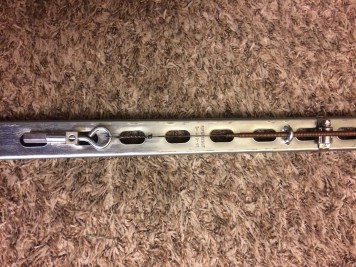
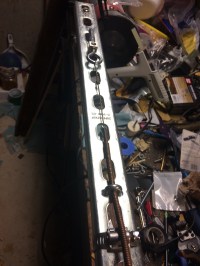
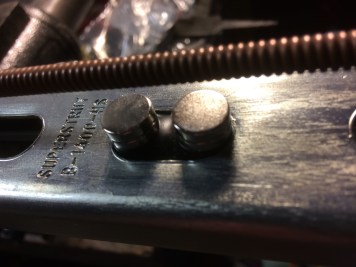
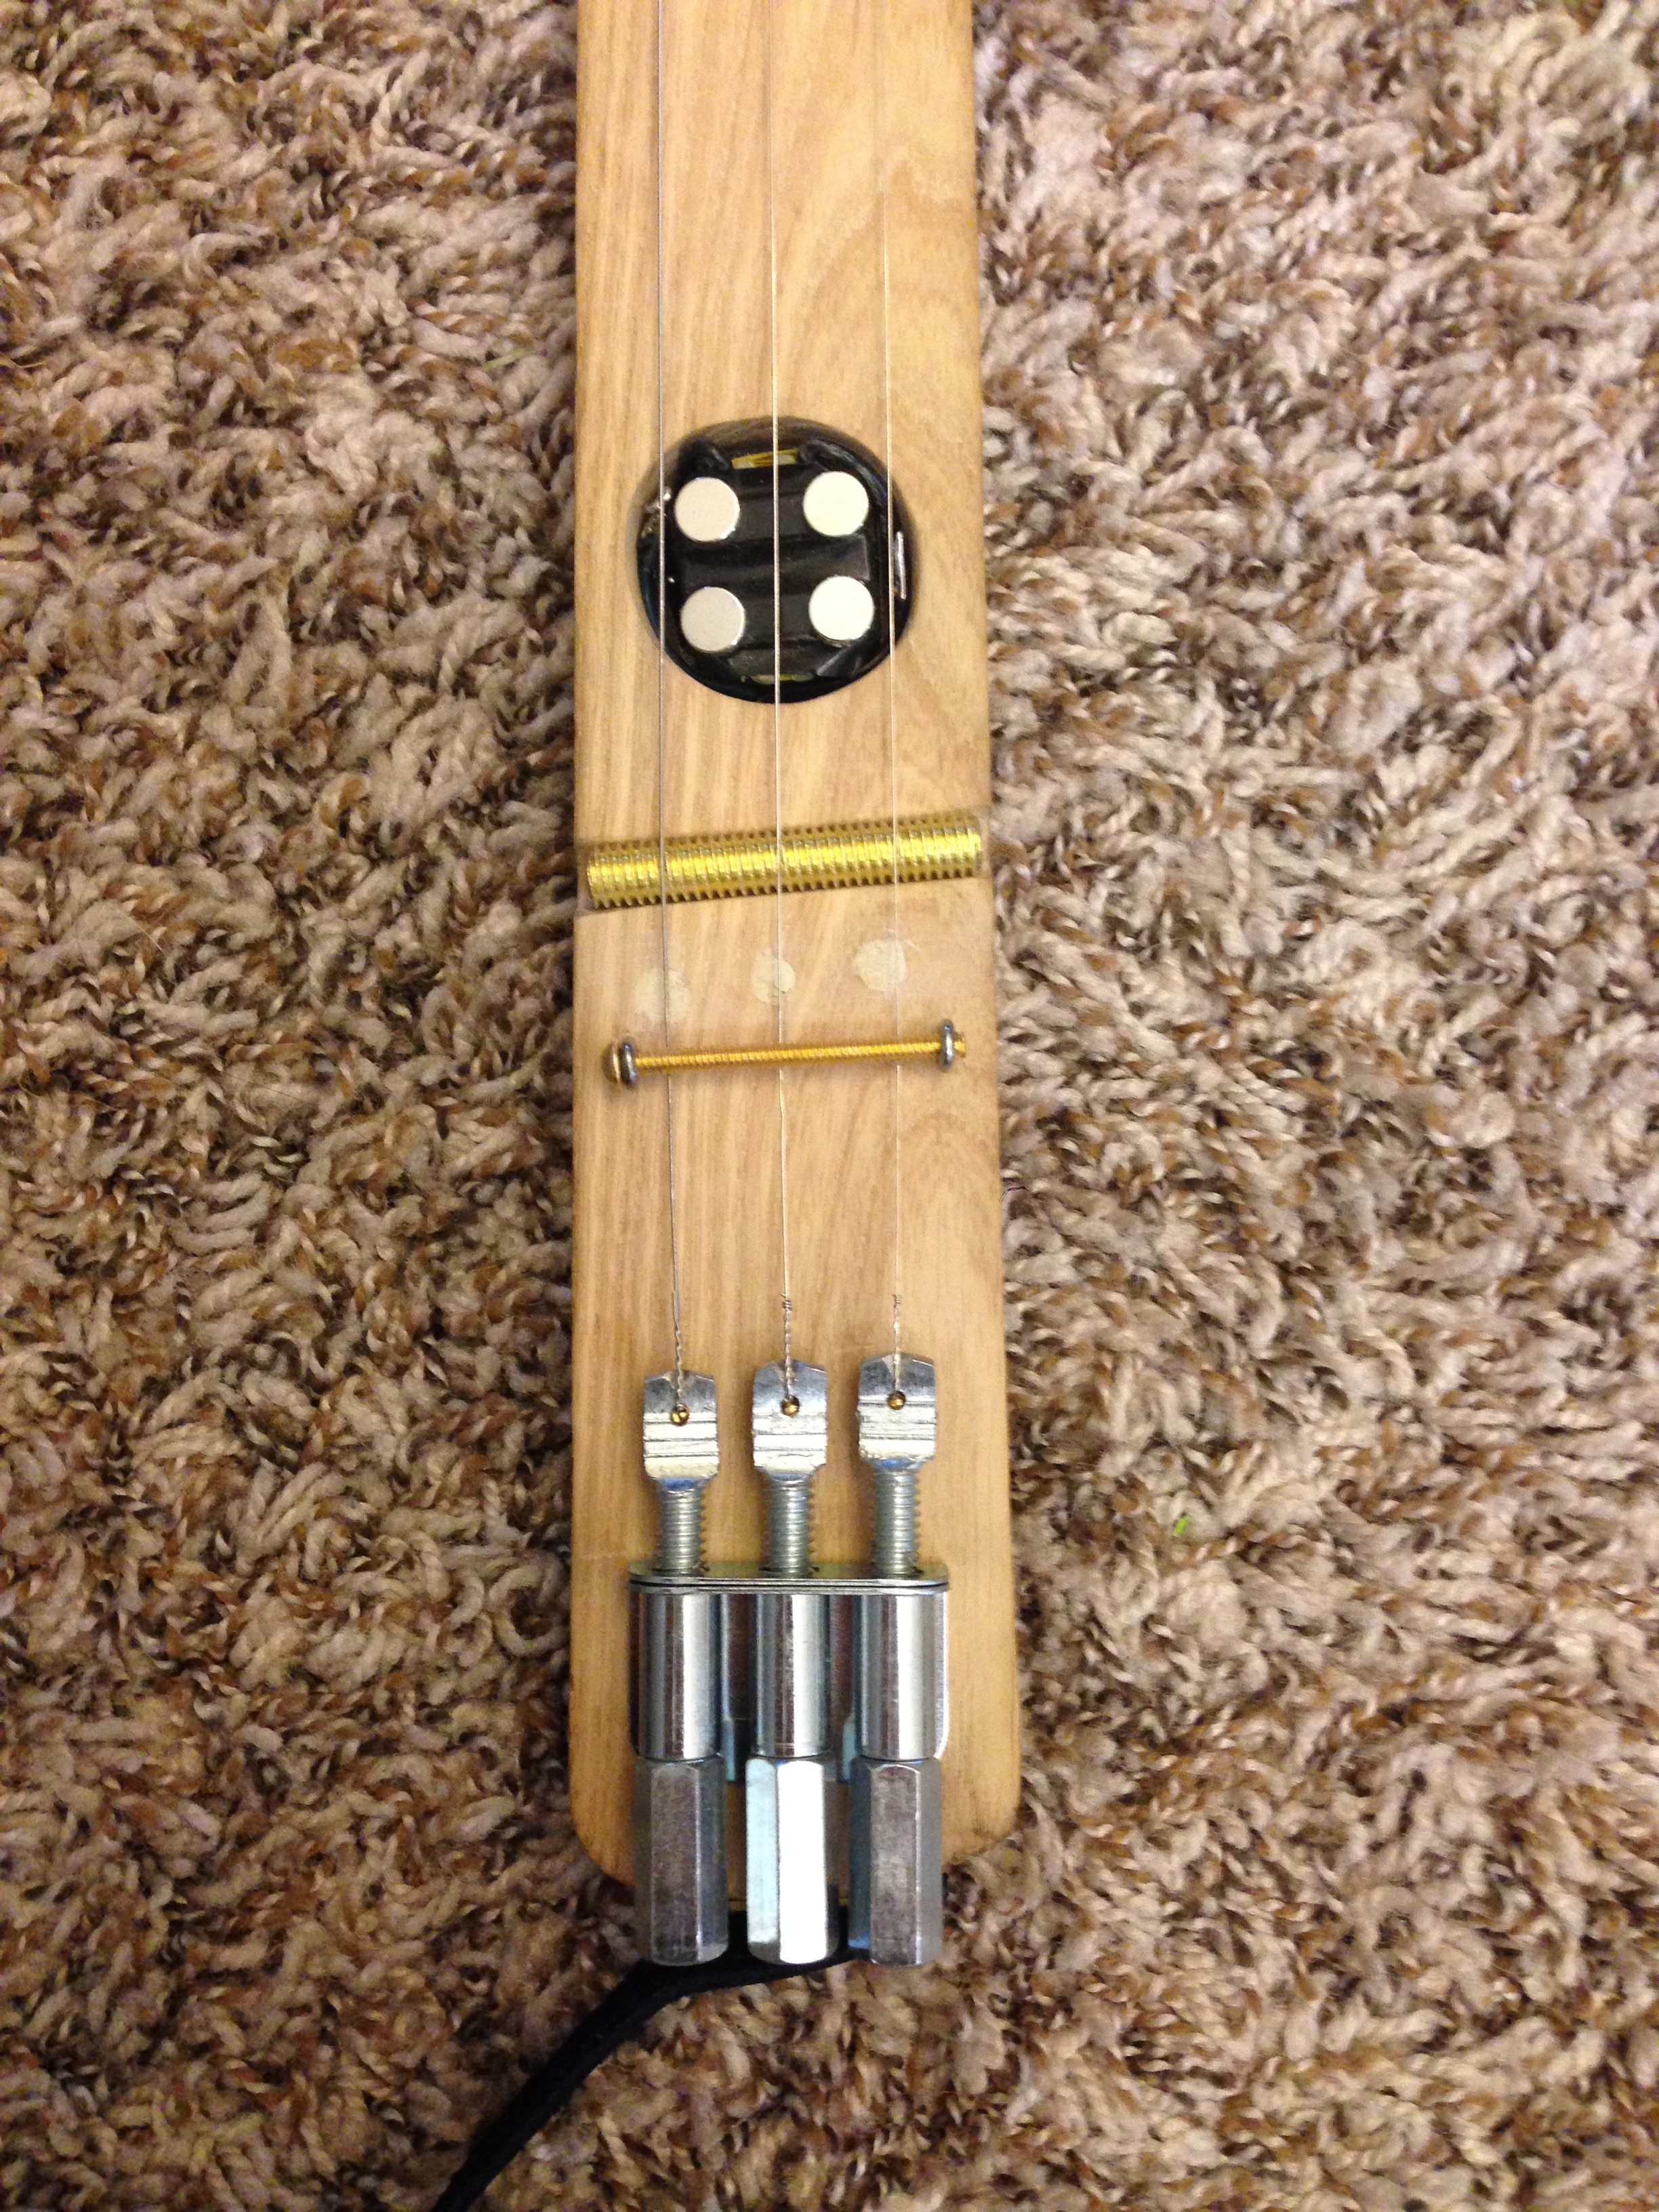
I filed a 3/8″ groove 24-3/4″ from the nut location and then cut two brass bolts, placing one in the bridge position and filing the other down to half thickness for the nut.

Pickup and 1/4″ Jack:

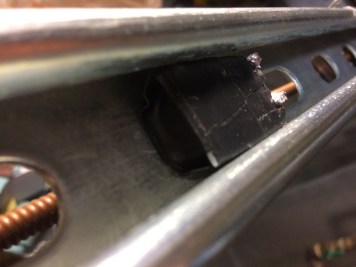
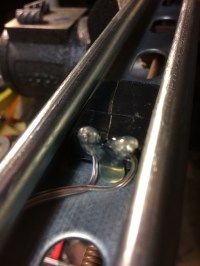
I purchased a second 1-1/4″ spade bit and sawed off the center point tip, so that the bottom would be flat and less likely to penetrate the back side of the bat. The pickup hole was started with the old bit with the tip and completed with the new bit without the tip. I installed a JSA Nd144 Electromagnetic Cigar Box Guitar Pickup and planned to wire it straight to the jack. My biggest concern was that I would drill through the back of the bat, so I was careful to measure and drill small bits at a time.

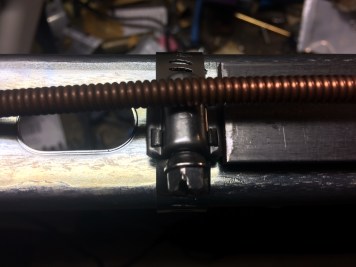
The endpin jack was too big to fit at the end of the bat as a circle, so I ground it down to more of a triangle, leaving the holes. The hole for the jack and wire was drill straight through to the pickup hole with a long 1/2″ bit. The jack fit well, but had to be bent a bit on the bottom to conform to the curve of the bat—a few brass screws held it in place nicely.

Tuners:

This was the first application of my Simple Tuners, as I created them for this particular project. Given that I wanted to keep a clean baseball bat profile at the back of the guitar, standard tuners would not work, so I came up with these tuners that attached to the front surface.
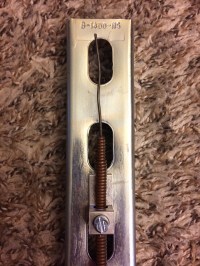
Headstock:

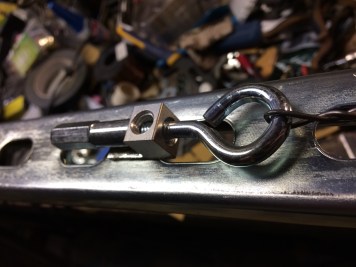
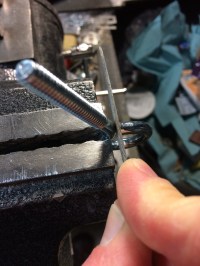
I found this old bottle opener and it fit perfectly on the headstock, so I fastened it down and then installed two more screws to set the height. I filed three notches to hold the strings and then added a string tensioner, made of a brass bolt and two small eye-screws and it was ready to go.

Check out this quick and dirty video:

Thanks,

uW5Z0b

“Slice of Deliverance” – Steel-String Resonator Banjolele w/ Removable Pickup

I chanced upon this banjo uke for a steal at the local antique mall and couldn’t pass up a new project. From what I’ve read, this style of banjo ukulele was produced through the 20’s and 30’s and it’s in really great shape compared to some I have seen for sale online.

This instrument came with a traditional drumhead, but no bridge. Against the advice of most ukulele enthusiast sites my plan was to string it up with steel strings, so that I could add a removable pickup, which is apparently I’ll advised because the neck could succumb to the pressure.

The Before Pictures:

Finish:

The finished was scratched, but was otherwise in fine shape; however, I wanted to add my own style, so I sanded off the finish and stained it with a vinegar and steel wool concoction.

I started with the white vinegar mix that adds a rusty, yellow hue while darkening deep spots. Then, I finished with an apple cider mix that adds a bit more color, grain depth and shine. The mix results in a distressed look that enhances the natural grain, while adding subtle nuances as well as dramatic extremes.

Drumhead and Bridge:

I began by cutting a piece of brass rod for the bridge and then strung it with the top four strings from a pack of DR Pure Blues 9’s.

The uke tuned up, but the drumhead was strained, which lowered the action to the point of rubbing on the rim. So I had to find a new material for the head that would be thin enough to offer as good of a voice as the drumhead.

I had a paint can lid laying on the bench and it appeared to be the right size, so I cut off the rim and it was a perfect fit to replace the drumhead.

Tuners and Tailpiece:

The tuners weren’t complete trash, but I didn’t like the look of them and since I was going to use steel strings, it seemed like a good idea to install decent tuners. I found a set of Grovers that worked great and had a lower profile.

The tailpiece was meant for holding strings with smaller balls ends, so I had to drill small holes in the body to accommodate the steel string balls and allow the tailpiece to sit flat against the body.

Pickup:

Since the paint can worked out so well, it created a perfect opportunity for using a removable pickup made from two of my Nd144 Electromagnetic Cigar Box Guitar Pickups. I had originally built a similar pickup for the “Teeth for Days” build, which had a body that was to thin to house a permanently installed pickup.

Therefore, I created a compact pickup and 1/4″ jack combination that could be easily installed and removed. Since the paint can lid is made of magnetically sensitive material, the pickup can be installed at a whim.

This solves two problems—first, placing the pickup directly on the paint can lid stifles the resonating effect to some degree, so easy installation and removable allows the user to play acoustically without compromise. Second, installation via the inherent magnets keeps me from having to drill extra holes and add unsightly hardware for both the pickup and the output jack. In short, the pickup is fully functionally electric without radically changing the acoustic nature of the instrument.

The most interesting and functional aspect of this pickup is its ability to be removed and potentially used to electrify/amplify another guitar with a body made from magnetically sensitive material, such as a lunch box or cookie tin. The pickup and output jack is wired up and taped together as one unit to simplify this process.

A second feature is the exposed, copper ground wire that makes contact with the paint can lid upon installation. This signal travels through the all magnetically sensitive materials that come in contact with the chain, so the paint can lid, bridge (if changed to steel), strings, and tailpiece all become a place to ground the signal, thus reducing amplifier noise/hum.

Accessories:

I added a strap button comprised of a security bolt and a brass knurled nut. I simply drilled a larger hole in the body and tailpiece to accommodate the larger bolt.

The strap was made from duct tape printed with an American flag design and the headstock strap tie was made of black duct tape with a brass binding screw to hold everything together.

Final Word…

This was a cool project and I developed and appreciation for the ukulele and the benefits of its small size, along with this instrument’s marriage with the banjo.

Check out this quick video that offers this instrument’s amplified and acoustic tones:

Thanks,

Yard Dog – “SuperStrut” All-Steel, Ultra-Low, Single-String Electric Djent Bass

At a past St. Louis Cigar Box Guitar Club meeting, Sean Oliveira brought in a bunch of piano strings from a unit he had dismantled. He was offering them for free, so I took a thick, low string along with a medium-sized one. I decided to challenge myself to build a guitar around the low string, which has a diameter of roughly a 1/4″.

Since this thick string would exert a lot of force against the instrument’s frame, I would need something a bit more resilient that my usual wood structure. I wanted to maintain a size similar to my previous builds so I chose slotted 1-5/8″ x 13/16 strut.

I started with a five foot length of strut and measured the distance between the bridge and the nut on my Peavey bass, which came out around 34-1/4″. Everything needed to be beefed up on this build—two-hole angles were too weak to handle the force—so everything had to be reconsidered.

Tuner and String:

The first thing that I needed was something to hold the string. Usually I would clamp it with a bolt and knurled nut, but a 1/4″ diameter string needs something more substantial. Luckily, I was able to find some aluminum wire lugs in the electrical section at Lowes. These were excellent both for clamping the string behind the nut and anchoring the tuner.

The tuner is made from a heavy-duty 1/4″ eyebolt, a 1/4″ x 3/4″ steel spacer and a 1/4″ rod coupling. The piano string came with a loop, so I removed a small amount of material at the junction of the eyebolt to allow the string loop to slip onto the eyebolt.

Nut and Bridge:

The nut and bridge are made of stainless steel pipe clamps. I wanted to attach the nut and bridge since the vibration of the large string made it difficult to keep a bolt or other material in place by the force of the string alone. These clamps work perfect for the string size and allow for a proper action. Additionally, I added a u-bolt at the back of the nut and bridge. There was very little tension holding the string in place—the u-bolts worked to create a more focused sound.

Fretboard:

The fretboard is a length of 1/8″ x 1″ steel. It is adhered to the strut with neodymium magnets, which raises the height of the steel just slightly, making the application of zip tie frets possible. I’ve always wanted to try zip tie frets, but I was unhappy with the zip tie being around the back of the neck—this allowed me to place the zip ties around just the steel bar, leaving the back of the strut smooth.

Pickup and Output Jack:

The base coil of this pickup is the same as the Nd144 Electromagnetic Cigar Box Guitar pickup, but I had to modify it to allow for a proper fit. The plastic on the bobbin had to be trimmed to the coil and I used slightly larger neodymium magnets that fit within the slot in the strut.

Nothing special about the 1/4″ output jack. I installed it close to the bottom, with some odds and ends, so that it was out-of-the-way and close to the pickup.

Here’s a quick and dirty video featuring my Peavey bass stack from way back:

(VIDEO PLAYBACK REQUIRES HEADPHONES—SMART PHONE SPEAKERS CAN NOT ACCOMMODATE LOW FREQUENCIES)

Thanks,

img_1926-4

“TSA Certified” SlipStick Carry-on Electric Steel Guitar

Well…this steel guitar is not actually TSA Certified, but at a length of 20-3/4 inches it does fit diagonally in a carry-on suitcase. I had built the first incarnation of this steel guitar a few years back when I had to go on a business trip and wanted an instrument to take along. I was only taking a carry-on so it had to be small enough to fit inside—it turned out to be a perfect fit.

Follow this link to the official project page for additional photos and build notes:

“TSA Certified” SlipStick Carry-on Electric Steel Guitar

Thanks,

Yard Dog – Aluminum Level Full-Scale Steel Guitar

December Project — 9 Volt Power Adapter Guitar Pickup

Hi,

December’s project is a high output/low noise guitar pickup, constructed of two power adapter coils, four metal picture hangers, a handful of neodymium magnets, and some electrical tape. This project comes in under $20 and can be modified to fit a number of applications— whether it’s a replacement pickup for a stock guitar or a home build like the six-string steel guitar I’m working on or even a four-string cigar box guitar.

I’m excited to release this versatile pickup design and am extremely happy with the results thus far. It’s stereo capabilities and compact design offer numerous options and I am convinced that further exploration will reveal many more useful applications.

Check out our other fun projects in the menu above and don’t hesitate to comment or contact us if you have questions, concerns, or need advise regarding a project.

Follow the link to this month’s project: https://junkshopaudio.com/9-volt-power-adapter-guitar-pickup/

uW5Z0b